Overview
Community Builder User management interface.
Description
In this screen you have the ability to look at a list of your users and sort them or filter them in different ways. You can also edit and create users, assign them to different groups and send them mass personalized emails.
How to access
You can access the Community Builder User Manager by clicking on the top menu bar, Components → Community Builder → User Management or Community Builder → User Management.
Screenshot
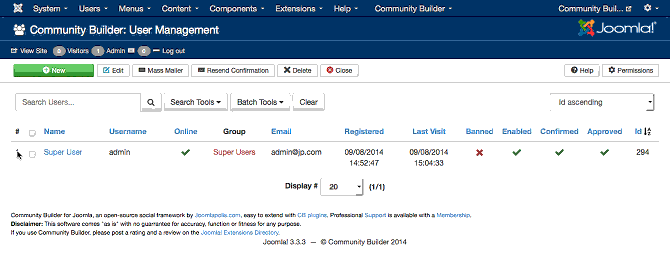
Column Headers
In the table containing the Community Builder users from your Joomla! site, you will see different columns. Here you can read what they mean and what is displayed in that column.
- Checkbox. Check this box to select one or more items. To select all items, check the box in the column heading. After one or more boxes are checked, click a toolbar button to take an action on the selected item or items. Many toolbar actions, such as Publish and Unpublish, can work with multiple items. Others, such as Edit, only work on one item at a time. If multiple items are checked and you press Edit, the first item will be opened for editing.
- Name. The full name of the user.
- Username. The name the user will log in as.
- Online. The online status of the user.
- Group. The list of groups that the user belongs to. Note that a user may belong to more than one group.
- Email. The e-mail address of the user is displayed here.
- Registered. The date the user was registered on this site.
- Last Visit. Here you can see the date on which the user last logged in.
- Banned. Here you can see if a user has his/her CB profile banned. You can click on the icon to toggle selection.
- Enabled. A user account can be enabled or disabled. You can click on the icon to toggle selection.
- Confirmed. The confirmation status of a user's e-mail address.
- Approved. The approval status of the user. You can click on the icon to toggle selection.
- Id. This is a unique identification number for this item assigned automatically by Joomla!. It is used to identify the item internally, and you cannot change this number. When creating a new item, this field displays 0 until you save the new entry, at which point a new ID is assigned to it.
Toolbar
At the top you will see the toolbar:
![]()
The functions are:
- New. Opens the edit screen to create a new user.
- Edit. Opens the edit screen for the selected user. If more than one user is selected (with checkboxes), only the first user will be opened. The edit screen can also be opened by clicking on the Name of the user.
- Mass Mailer. Opens the Mass Mailer screen to send email messages to selected users.
- Resend Confirmation. Resends email confirmation messages to selected users that have not confirmed their email addresses.
- Delete. Delets selected users.
- Help. Opens this help screen.
- Permissions. Opens the Joomla permissions settings screen for this area.
Search Tools and Sorting
Under the toolbar you will see the search tools and sorting toolbar:
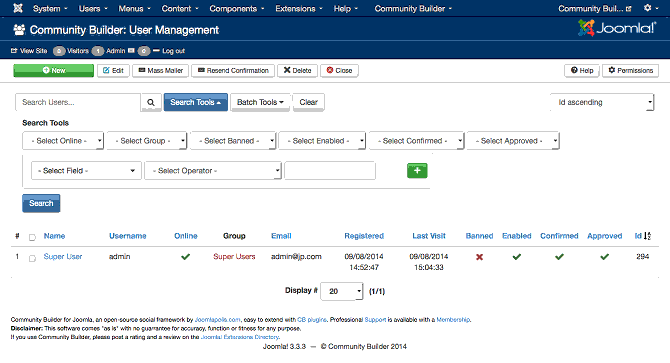
The filters for the Search Tools set are:
- Select Online. Use to filter based on online or offline status.
- Select Group. Use to filter users that belong to a specific group.
- Select Banned. Finds users with banned CB profiles.
- Select Enabled. Locate enabled (activated) or disabled users.
- Select Confirmed. Find users that have confirmed their e-mail address.
- Select Approved. Find users that have been approved by CB Moderators.
To the right of the Search Tools button, there is a drop down sorting order field that is by default set to 'Id ascending'. You can sort the user management table by selecting a different value from this drop down field, or you can just click on one of the table columns to force sorting.
Batch Tools
Under the toolbar you will see the batch tools toolbar:

You can perform batch processing on any checkbox selected user rows based on the following oprions:
- Select Groups. Lets you select one or more groups that should be added to selected users.
- Select Banned. Lets you set the user status to one of 'Banned', 'Pending' or 'Active'.
- Select Enabled. Lets you enable or disable multiple selected users.
- Select Confirmed. Lets you batch confirm or put in pending state the email confirmation status of users.
- Select Approved. Batch 'Approve', 'Reject' or put in 'Pending' state the approval status of users.
Once users are selected (by ticking row checkboxes) and selecting the relevant Select options, you can then click on the blue Process button to perform that batch processing task.
Clear Button
The Clear button to the right of the Batch Tools button is used to bring the User Management page back to its default view. Clicking on the Clear button will revert sort order and clear filtering and batch select parmateres.
Quick Tips
TBS
Related information
- User Management Edit page
- User Management Mass Mailer page
- User Management Permissions page
- Configuration Registration Admin Approval parameter
In addition to this online reference it is highly recommended that
you download the latest CB Primer Book here!


