Overview
Community Builder Configuration interface.
Description
In this screen you can configure core settings of Community Builder.
How to Access
You can access the Community Builder Configuration page by clicking on the top menu bar Components → Community Builder → Configuration or selecting Community Builder → Configuration.
Screenshot
Details
The Community Builder Configuration page contains core parameter settings organized in the following tabs:
- General. Has general purpose parameter settings.
- Registration. Lets you configure the registration process.
- User Profile. Configuration parameters for user profiles.
- Images. Parameters that deal with image handling.
- Moderation. How moderation processes are configured.
- Connections. Connections feature parameter settings.
- Integrations. Various integration parameters.
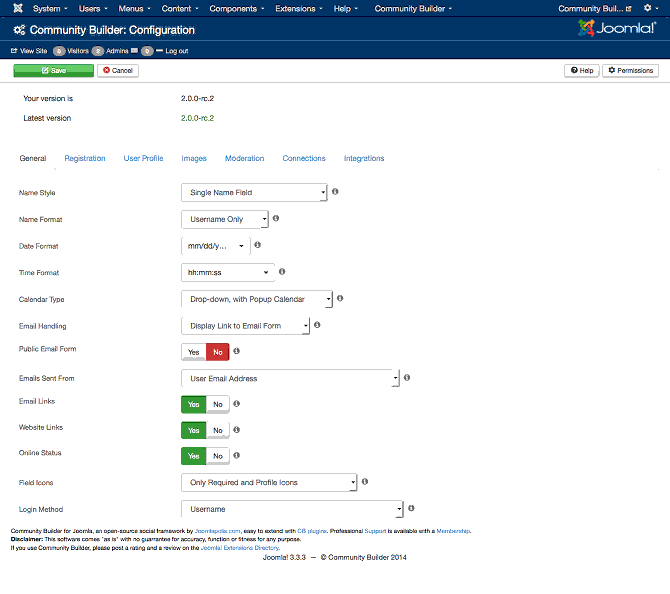
General tab
The General tab has the following parameters:
- Name Style. Lets you select how user names will be styled based on following options:
- Single Name Field
- First and Last Name Fields
- First, Middle and Last Name Fields
- Name Format. How to display the Formatted Name field (with Name Style applied) based on following options:
- Name Only
- Name (Username)
- Username Only
- Username (Name)
- Date Format. Date format selection for Community Builder date fields.
- Time Format. Time format selection for Community Builder datetime fields.
- Calendar Type. Choose which calendar you would like to use for date fields based on following options:
- Drop-down, with Popup Calendar
- Drop-down, without Popup Calendar
- Popup Calendar
- Email Handling. Choose how to handle Primary Email Address (email) field:
- Display Email Only
- Display Email with Mail-To Link
- Display Link to Email Form
- Do Not Display Email
- Public Email Form. Choose if Primary Email Address form (see previous parameter) is publicly accessible.
- Emails Sent From. Choose how sent from property or sent emails should appear based on following options:
- User Email Address
- Admin Email Address with Reply-To User Email Address
- Email Links. Choose if email fields (not primary email address field) should be linked to email address or not.
- Website Links. Choose if website fields should be linked to website field URL or not.
- Online Status. Choose if user online status should be displayed or not.
- Field Icons. Choose which field icons shoulf be shown during editing. Following options are available:
- No Icons
- Only Required Icon
- Only Profile and No Profile Icons
- Only Required and Profile Icons
- Only Info Icon
- Only Info Text
- Only Required and Info Icons
- Only Required Icon and Info Text
- Only Profile and Info Icons
- Only Profile Icons and Info Text
- All Icons (Required, Profile and Info)
- All Icons (Required and Profile) and Info Text
- Login Method. Choose how users should login when using CB Login module and Login form. Following options are available:
- Username
- Username of Email Address
- Email Address
- Username, Email Address, or CMS Authentication Plugins
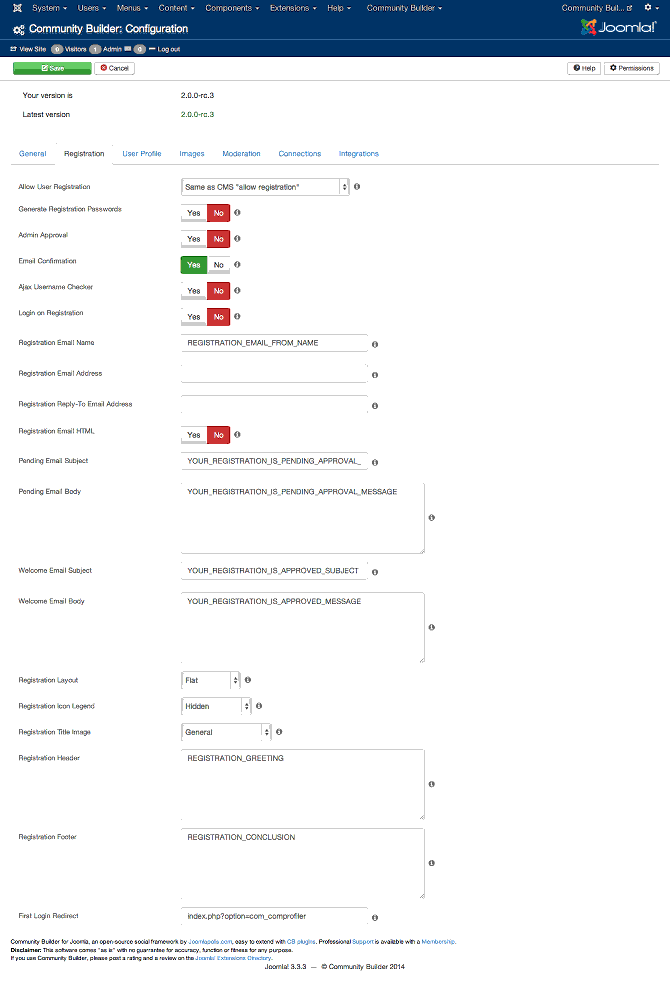
Registration tab
The Registration tab has the following parameters:
- Allow User Registration. Choose if registration access should be same as the CMS or allow registration regardless of CMS settings. Recommended to set Yes to be independent of CMS and turn off registration within the CMS settings. Available options are:
- Same as CMS "allow registration"
- Yes, independent of CMS "allow regostration"
- Generate Registration Password. Yes/No selection to auto-generate passwords for user during registration process.
- Admin Approval. Yes/No selection to require administrative approval from CB Moderators for each frontend registration.
- Email Confirmation. Yes/No selection to require email confirmation (via confirmation link) for each frontend registration.
- Ajax Username Checker. Turn on or off the ajax username checker.
- Login on Registration. Choose if login form should be displayed on registration form.
- Registration Email Name. The email name to use when sending emails for the registration workflow process.
- Registration Email Address. The email address to use to send emails during the registration workflow process.
- Registration Reply-To Email Address. The Reply-To email address for the registration process email messages.
- Registration Email HTML. Enable HTML messages for registration process.
- Pending Email Subject. The subject of the pending approval email message. CB field substitutions are supported.
- Pending Email Body. The body of the pending approval email message. CB field substitutions are supported.
- Welcome Email Subject. The subject of the welcoming email sent after successful registration process completion.
- Welcome Email Body. The body of the welcoming email sent.
- Registration Layout. The layout to be used on the registration form. Available options are:
- Flat
- Tabbed
- Step by Ttep
- Registration Title Image. Choose image for registration form canvas. Dropped down field options are populated with image filenames stored in the images folder.
- Registration Header. Input the text (HTML supported) message to display above the registration form.
- Registration Footer. Input the text (HTML supported) message to display below the registration form.
- First Login Redirect. Input the URL to redirect user after very first login. Default value is: index.php?option=com_comprofiler
Screenshot
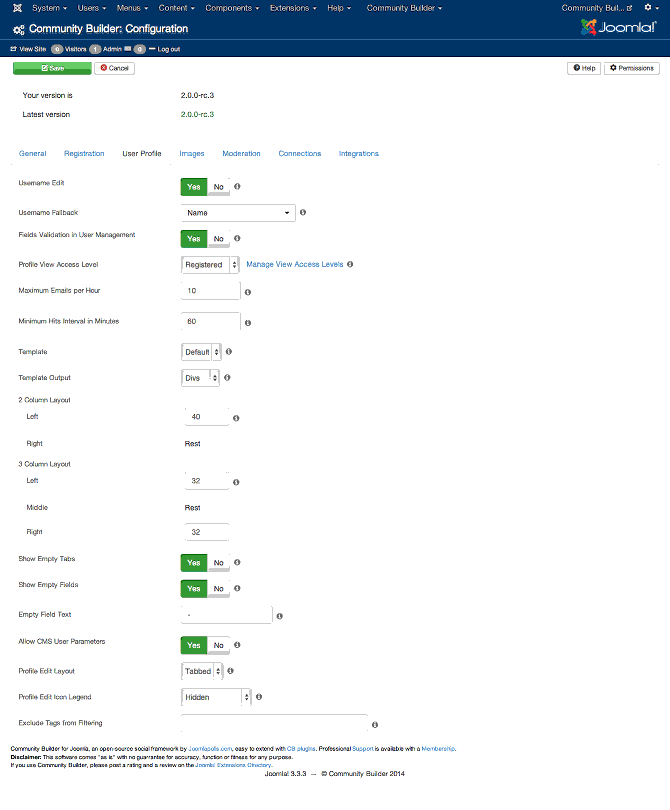
User Profile tab
The User Profile tab has the following parameters:
- Username Edit. Select Ye/No to allow users to change their username.
- Username Fallback. Choose which field to use as username if username field is not present during form storage.
- Fields Validation in User Management. Select Yes/No if backend admin editing of user profiles should also enforce required CB fields.
- Profile View Access Level. Select the View Access Level required for profile viewing.
- Maximum Emails per Hour. Input maximum emails per hour a single user is allowed to send.
- Maximum Hits Interval in Minutes. Input minumum interval in minutes for profile viewing calculations.
- Template. Select the Community Builder template.
- Template Output. Select the output method for template. Options are:
- Divs
- Tables
- 2 Column Layout Left. Input percentaage of left column width for 2-column layout.
- 2 Column Layout Right. Automatically calculated.
- 3 Column Layout Left. Input percentage of left column width for 3-column layout.
- 3 Column Layout Middle. Automatically calculated.
- 3 Column Layout Right. Input percentage of right column width for 3-column layout.
- Show Empty Tabs. Choose if empty tabs should be displayed in frontend profiles.
- Show Empty Fields. Choose if empty fields should be displayed in frontend fields.
- Empty Field Text. Input the text that should appear when displaying empty fields.
- Allow CMS User Parameters. Choose is users can edit their CMS parameter fields (frontend language, default editor, etc.).
- Profile Edit Layout. Choose the layout to be used during frontend profile editing. Available options are:
- Flat
- Tabbed
- Profile Edit Icon Legend. Choose how to display profile edit icons. Options are:
- Hidden
- Top
- Bottom
- Top and Bottom
- Exclude Tags from Filtering. Input space separated HTML tags that should not be stripped during profile rendering.
Screenshot
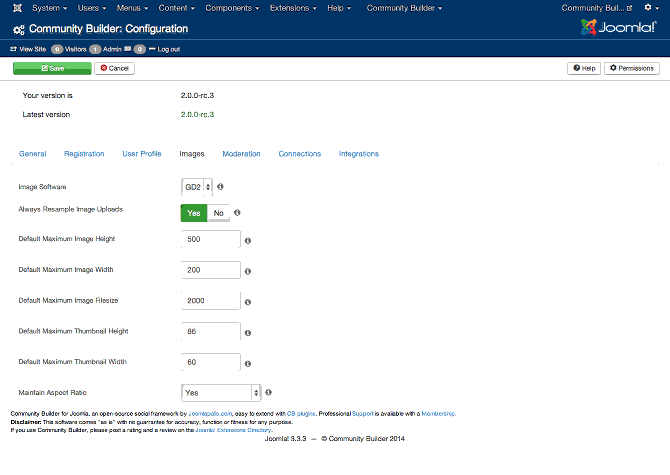
Images tab
The Images tab has the following parameters:
- Image Software. Choose the software to use for image processing. Options are automatically populated based on PHP configuration.
- Always Resample Image Uploads. Choose if images uploaded should be resampled.
- Default Maximum Image Height. Default maximum image height in pixels. Can be over-ridden on an image field basis.
- Default Maximum Image Width. Default maximum image width in pixels.
- Default maximum Image Filesize. Default maximum image filesize in kilobytes.
- Default Maximum Thumbnail Height. Default maximum thumbnail image height in pixels.
- Default Maximum Thumbnail Width. Default maximum thumbnail image width in pixels.
- Maintain Aspect Ratio. Choose how aspect ration should be maintained during image resizing. Options are:
- Yes
- Yes, with Cropping
- No
Screenshot
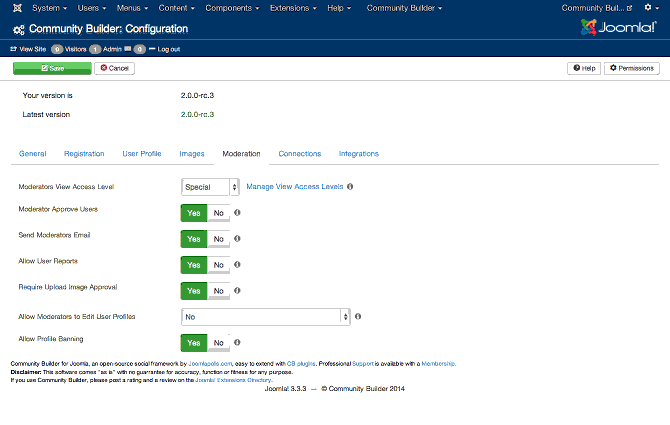
Moderation tab
The Moderation tab has the following parameters:
- Moderators View Access Level. Select the view access level required for CB moderators.
- Moderator Approve Users. Select if moderators can approve user registrations.
- Send Moderators Email. Choose is moderators should be sent notification emails for pending actions.
- Allow User Reports. Choose is users are allowed to sumbit reports against other users.
- Require Upload Image Approval. Choose if uploaded images require approval before appearing in profiles. Can be over-ridden on an image field basis.
- Allow Moderators to Edit User Profiles. Choose if moderators can edit user profiles.
- Allow Profile Banning. Choose is profile banning is enabled.
Screenshot
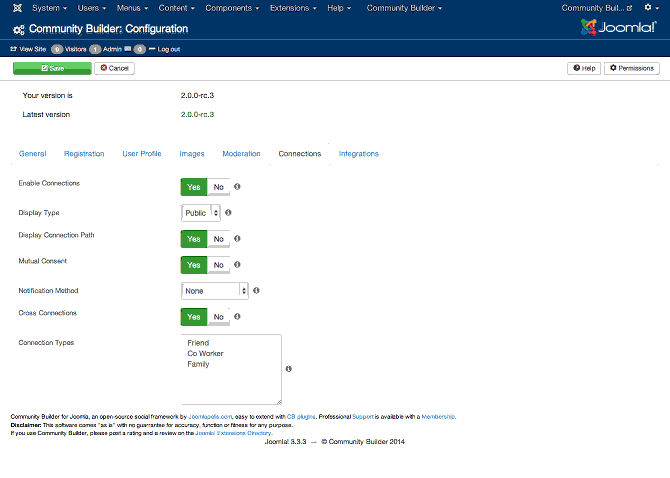
Connections tab
The Connections tab has the following parameters:
- Enable Connections. Yes/No field to enable the connections functionality.
- Display Type. Select the display type of connections. Options are:
- Public
- Private
- Display Connection Path. Choose is the connections path should be displayed between two users.
- Mutual Consent. Select if connections need to be mutually approved or not.
- Notification Method. Choose notification method to be used for connection workflow. Options are:
- None
- PMS
- PMS and Email
- Cross Connections. Choose if connections are bidirectional or single direction.
- Connection Types. Enter the connection types you want.
Screenshot
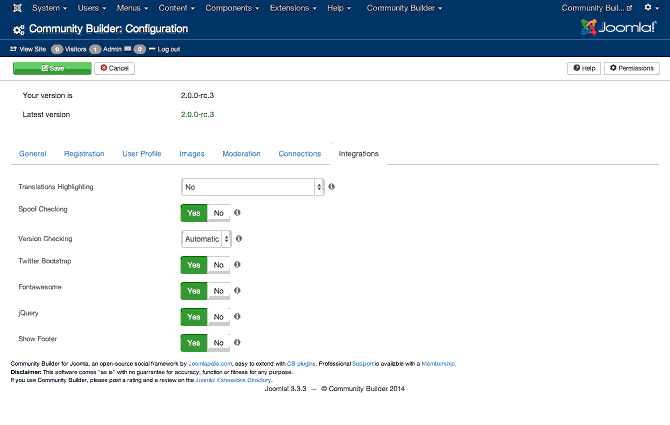
Integrations tab
The Integrations tab has the following parameters:
- Translations Highlighting. Translations highlighting tool can be used to identify and debug Community Builder translation strings. Available options are:
- No
- Text Markers
- HTML and Text Markers
- Markers and List Untranslated Strings
- Markers and List All Strings
- Spoof Checking. Choose if anti-spoof session checking should be used or not.
- Version Checking. Choose is version checking should be automatic or manual.
- Twitter Bootstrap. Choose if Twitter bootstrap CSS should be loaded from Community Builder template automatically or not.
- Fontawesome. Choose if Fontawesome CSS should be loaded from Community Builder template automatically or not.
- jQuery. Choose if jQuery should be loaded from Community Builder automatically or not.
- Show Footer. Shows or hides powered by footer. Removal plugin must be present in order to enable removal setting.
Screenshot
Toolbar
![]()
Quick Tips
TBS
Related Information
- TBS
In addition to this online reference it is highly recommended that
you download the latest CB Primer Book here!