Overview
Community Builder Tab Management interface.
Description
In this screen you create new fields or edit existing ones.
How to Access
You can access the Community Builder Field Management page by clicking on the top menu bar, Components → Community Builder → Field Management or Community Builder → Field Management.
Screenshot
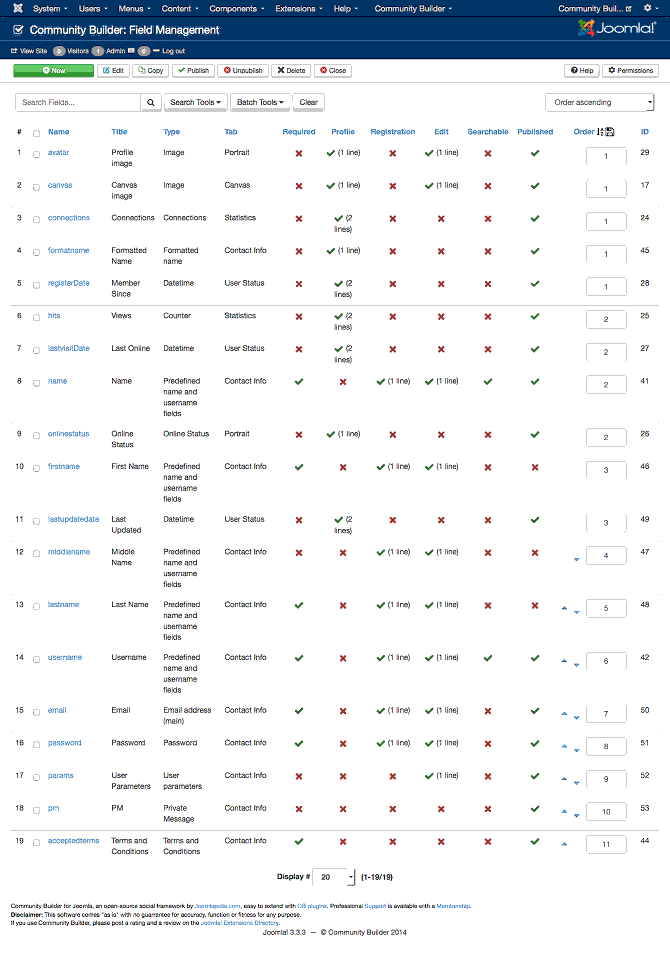
Column Headers
In the table containing the Community Builder tabs, you will see different columns with the following headings and definitions:
- Name. The name of this field.
- Title. The title of the field that will appear in frontend and backend profile pages.
- Type. The field type.
- Tab. The tab name this field is placed on.
- Required. If the field is required or not.
- Profile. How the field is displayed during frontend profile viewing.
- Registration. If the field should appear on the registration form.
- Edit. How the field is displayed during frontend profile editing.
- Searchable. If the field is searchable in user lists or Joomla searching.
- Published. If the field is published or not.
- Order. You can order how fields displayed in the same tab so that a field with lower order number appears first.
- ID. This is a unique identification number for this item assigned automatically by Community Builder. It is used to identify the item internally, and you cannot change this number. When creating a new item, this field displays 0 until you save the new entry, at which point a new ID is assigned to it.
Toolbar
At the top you will see the toolbar:
![]()
The functions are:
- New. Opens the edit screen to create a new field.
- Edit. Opens the edit screen to edit a selected field. If more than one field is selected (with check-boxes), only the first one will be opened. The edit screen can also be opened by clicking on the Name of the field.
- Copy. Copies a selected field.
- Publish. Publishes all selected field.
- Unpublish. Unpublishes all selected field.
- Delete. Deletes all selected field.
- Help. Opens this help screen.
- Permissions. Opens the Joomla permissions settings screen for this area.
Search Tools and Sorting
Under the toolbar you will see the search tools and sorting toolbar:
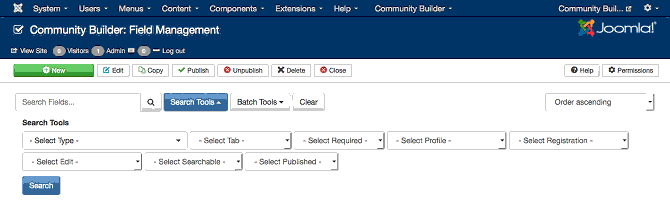
The filters for the Search Tools set are:
- Select Type. Filters off field type.
- Select Tab. Find all fields associated with a specific Community Builder tab.
- Select Required.
- Select Profile.
- Sepect Registration.
- Select Edit.
- Select Searchable.
- Select Published. Use to filter based on published or unpublished status.
To the right of the Search Tools button, there is a drop down sorting order field that is by default set to 'Order ascending'. You can sort the field management table by selecting a different value from this drop down field, or you can just click on one of the table column titles to force sorting on that column.
Batch Tools
Under the toolbar you will see the batch tools toolbar:
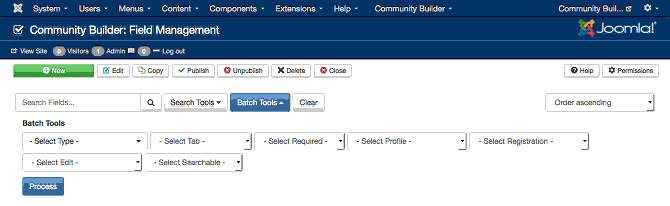
You can perform batch processing on any checkbox selected rows based on the following oprions:
- Select Type. Lets you select the field type that should be assigned to selected rows.
- Select Tab. Lets you set the tab that should be assigned to selected rows.
- Select Required. Lets you set the field required setting that should be applied to selected rows.
- Select Profile. Lets you set the profile viewing status to be applied for selected rows.
- Select Registration. Lets you select if selected rows should be set for registration form inclusion or not.
- Select Edit. Sets how editing of fields should be configured.
- Select Searchable. Lets you set selected field rows to be searchable.
Once rows are selected (by ticking row check-boxes) and selecting the relevant Select options, you can then click on the blue Process button to perform that batch processing task.
Clear Button
The Clear button to the right of the Batch Tools button is used to bring the page back to its default view. Clicking on the Clear button will revert sort order and clear filtering and batch select parmateres.
Core Fields
The following 19 fields are automatically installed and preconfigured with every new (first time) Community Builder installation:
- acceptedterms. The Terms and Conditions field (fieldtype: Terms and Conditions) is placed on the Contact Info tab and is initially not set to appear on Registration form as it requires user configuration.
- avatar. The Profile Image field (fieldtype: image) is placed on the Portrait tab.
- canvas. The Canvas Image field (fieldtype: image) is placed on the Canvas tab.
- connections. The Connections field (fieldtype: connections) is placed on the Statistics tab.
- email. The Email field (fieldtype: Email address (main)) is placed on the Contact Info tab.
- firstname. The First Name field (fieldtype: Predefined name and username fields) is on the Contact Info tab.
- formatname. The Formatted name field (fieldtype: Formatted Name) is on the Contact Info tab.
- hits. The Views field (fieldtype: counter) is on the Statistics tab.
- lastname. The Last Name field (fieldtype: Predefined name and username fields) is on the Contact Info tab.
- lastupdatedate. The Last Updated field (fieldtype: DateTime) is on the User Status tab.
- lastvisitDate. The Last Online field (fieldtype: DateTime) is on the User Status tab.
- middlename. The Middle Name field (fieldtype: Predefined name and username fields) is on the Contact Info tab.
- name. The Name field (fieldtype: Predefined name and username fields) is on the Contact Info tab.
- onlinestatus. The Online Status field (fieldtype: Online Status) is on the Portrait tab.
- params. The User Parameters field (fieldtype: User Parameters) is on the Contact Info tab.
- password. The Password field (fieldtype: Password) is on the Contact Info tab.
- pm. The PM field (fieldtype: Private Message) is on the Contact Info tab. Used for Private Message integration with uddeIM.
- registerDate. The Member Since field (fieldtype: DateTime) is on the Contact Info tab.
- username. The Username field (fieldtype: Predefined name and username fields) is on the Contact Info tab.
All of these core tabs when selected for editing have a Global and a Parameters tab used to configure their global settings and tab/plugin specific settings.
Quick Tips
TBS
Related information
- TBS
In addition to this online reference it is highly recommended that
you download the latest CB Primer Book here!


