FAQ
- Details
- Category: FAQ
- Hits: 187857
Very often your Google powered gmail web client incorrectly interprets automated email messages as spam and places them in your webmail spam folder.
You need to follow these simple steps to tell Google that such emails are not spam and to add the senders to your contact list in order to ensure tha future emails from these senders are never placed in your spam folder ever again:
- Open your webmail (gmail) client (see figure 1)
- Click on the More menu item in the left column to reveal the Spam folder menu item and click on this item (see figure 2)
- Select all the check boxes of the messages that you feel are not spam and then click on the Not spam button (figure 3)
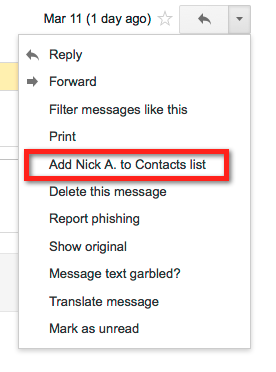
- Click on each message and add specific sender to your Contact list from the drop-down menu in the upper right corner of the opened message (figure 4)
Done!
Google will learn and you will no longer miss important messages.
Figure 1: Clicking on the More menu to reveal the Spam folder menu
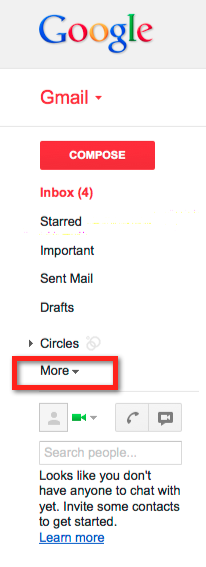
Figure 2: Clicking on the revealed Spam folder menu to see all messages in your spam folder

Figure 3: Select all not spam messages and click on Not spam button
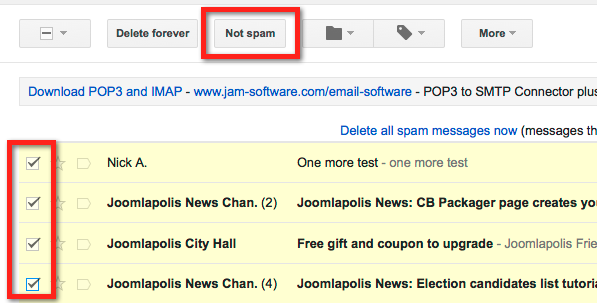
Figure 4: Add each sender to your Contacts list
- Details
- Category: FAQ
- Hits: 8443
If you are using a gmail powered email address in your Joomlapolis username account, then you might be missing important email messages because Google is wrongly filtering your email messages and incorrectly placing them in your gmail spam folder.
If you must use a gmail powered email to register, then please follow these steps to make sure that you tell google that such emails are not spam:
In order to tell google that they made a mistake please follow these steps to report:
- First you need to find the email in your gmail webmail spam folder.
- click on the message to read it
- click on the More dropdown arrow on the opposite right side of the sender name
- Select the Show original item
- Find the Message-Id: <XXXXX @ YYYYY . ZZZ> line
- Find the Date: (sent) line just above the Message-Id line
- Access the Google report form at: http://support.google.com/mail/bin/request.py?&bug_topic=Incoming+Message+Not+Received&ctx=gtag_headers&contact_type=gtag_headers
- Fill in the form using the XXXXX @ YYYYY . ZZZ message id and the date sent information from the Show original item of the spam folder email.
- Close the Show original browser tab
- Click on the gray [Spam x] button above the sender name to mark that this conversation is not spam
- Select the Add Joomlapolis to contacts list item from the More dropdown menu to add our address to your contacts list (and approved senders list)
Repeat above for all emails you see from joomlapolis.com in the google spam folder.
Thanks for doing this for us - this way you will not miss out on future emails and important notices.
- Details
- Category: FAQ
- Hits: 38866
The release of Joomla 2.5.28 marks the last planned released of the Joomla 2.5 series as its support is scheduled to end on Decemeber 31st, 2014.
This means that all Joomla 2.5 series must upgrade to the latest Joomla 3.3 series release, which at the time of this writing is Joomla 3.3.6.
Althought there are many online resources available that discuss and guide you through the upgrade process and the Planning for Mini-Migration - Joomla 2.5 to 3.x Joomla resource, we have compiled our own guide that is especially focused on Joomla 2.5 series sites with Community Builder 2.0 installed.
Don't let the many details scare you - it is really a very straight-forward process and the details are really meant to help you understand what is happening and why.
The entire process described in this article is demonstrated in our CB 2.0 Tutorials - 39 - Joomla 2.5 to Joomla 3.3 migration video.
Differences between Joomla 2.5 and Joomla 3.3
The main differences between Joomla 2.5 and Joomla 3.3 that will most likely influence your upgrade situation are:
- Joomla 3.3 uses Bootstrap, where Joomla 2.5 does not. The Bootstrap markup makes your Joomla website responsive, which means that your Joomla website should look great in all viewing devices (desktop, tablets and mobile phones)
- Joomla 3.3 uses jQuery, where Joomla 2.5 does not.
- Joomla 3.3 needs PHP 5.3.10+, but Joomla 2.5 will work on PHP 5.2.4+.
- Joomla 3.3 needs MYSQL 5.1+, but Joomla 2.5 will work on MYSQL 5.0.4+.
In addition to these high-level differences your upgrade process may run into snags due to one or more of the following issues:
- Extension compatibility (in case you have installed some third-party extensions on your Joomla 2.5 site that are not Joomla 3.3 compatible)
- Template compatibility (there are some differences in the Joomla templating system that will most likely make your Joomla 2.5 template not fully compatible with Joomla 3.3)
Planning your Upgrade
Before starting to upgrade, you should do your homework. You have a live website that you need to upgrade, so spend some time to carefully plan your upgrade project (yup, you should view it as a project).
Here are some planning steps that will help you:
- Verify that your hosting environment supports the Joomla 3.3 technical requirements (PHP 5.3.10+ and MYSQL 5.1+). If it does not ask your host helpdesk to upgrade your account appropriately. If your host has an issue with this request, then you should consider changing hosts.
- This is a great opportunity to remove any inactive extsnions you have on your Joomla 2.5 website. There is no need to keep old inactive extensions on your website and it does pose a security threat in the first place.
- Make a list of all your third-party extensions (modules, components and plugins) installed on your Joomla 2.5 website. Visit each extension provider website and make sure that you have the latest version and that this version is also Joomla 3.3 compatible. Some extensions might have a new - only for Joomla 3.3 - extension release. If this is the case, then download such releases and keep them handy for your post Joomla 3.3 upgrade steps. Some extensions (usually modules) might need post upgrade configuration changes due to the new CSS stylings (and Bootstrap) present in Joomla 3.3 - make a list of needed changes for each one.
Community Builder 2.0.4 (and CB 1.9.1) works just fine on both Joomla 2.5 and Joomla 3.3 - there are some minor adjustments needed for the CB Login module (see post upgrade CB steps for details). - Contact your template provider and download the Joomla 3.3 template version or ask them for specific instruction on changes that need to be made to your Joomla 2.5 template once you have upgraded to Joomla 3.3.
Upgrade Steps
Once you have done your planning steps and have all your resources ready (e.g., new template, new extension, etc.). you can follow these steps:
- Make a backup of your Joomla 2.5 website before starting - even better to clone your Joomla 2.5 website and test the upgrade process on the clonned site before replicating it on your production site.
- Verify that your Joomla 2.5 site is on using Joomla 2.5.28. If it is not, you can easily upgrade to Joomla 2.5.28 from your Joomla 2.5 Component → Joomla Update page
- Verify that your third-party extensions are the latest Joomla 2.5 (and Joomla 3.3 if possible) compatible versions. You should have done this in step 2 of the planning process, but you can also do a sanity check by making sure that there are no reported upgrades in your Joomla 2.5 Control panel Updates icon or your Extension → Extension Manager → Update tab.
- Go back to your Joomla 2.5 Component → Joomla Update page and click on the Options button and then change the Update Server parameter in your Update Source tab from Long Term Support (recommended) to Short Term Support and click the Save button. Please note that these parameter settings are no longer accurate as Joomla 3.X will be supported for at least 2-4 years.
- Your Joomla 2.5 Component → Joomla Update page should now show you the option to one click install the latest Joomla 3.3.6 (or better) release. Click in the Install the update button.
Your Joomla 2.5 website has been upgraded to Joomla 3.3 and you are now ready for your post upgrade process steps.
Post Upgrade Steps
Now that your website has been upgraded to the latest Joomla 3.3 release, you can follow these post upgrade steps:
- Visit your Joomla 3.3 Extensions → Template Manager and select the isis - Default template as your Administrator template.
- Install any Joomla 3.3 extension upgrades you identified during step 2 of your planning phase and/or make any post upgrade changes recommended by your third-party developers.
- Install your new Joomla 3.3 compatible template from your template provide and/or make any changes to your existing template.
- Test and inspect everything - frontend and backend.
Default Joomla Template Upgrade Steps
As indicated in step one of the previous section your Joomla 3.3 administrator template should be set to Isis - Default.
If your Joomla 2.5 website was using one of the built-in Joomla site templates, e.g., Beez2-Default, you can choose to use one of the Joomla 3.3 site templates, e.g. Protostar - Default. If this is the case, you may also need to change the position of your main menu module from position-7 (which was the case on your Joomla 2.5 default template environment) to position-1 (for the Protostar template on Joomla 3.3). You should also set your Menu Class Suffix on your main menu module to nav-pills to get the default menu styling on Joomla 3.3.
Community Builder Post Upgrade Steps
Community Builder 2.0.4+ will work just fine on both Joomla 2.5 and Joomla 3.3 environments. User profile data and your Community Builder configurations will remain intact.
The following changes need to be applied to your Community Builder Login module configuration to adjust its styling to take advantage of the new CSS code and Bootstrap present in Joomla 3.3:
- Visit your Community Builder Login module instances from your Joomla 3.3 Extensions → Module Manager page
- In the Advanced Options tab set the Alternative Layout parameter to bootstrap.
That's it for Community Builder specific post upgrade configuration changes.
Conclusion
Upgrading from Joomla 2.5 to Joomla 3.3 is not as complicated as you may think. Proper planning and doing your homework should get you to your Joomla 3.3 - very secure and totally responsive - website.
We have prepared the CB 2.0 Tutorials - 39 - Joomla 2.5 to Joomla 3.3 migration video (subscribe to our channel) demonstrating a Joomla 2.5 / Community Builder 2.0 installation being upgraded to Joomla 3.3.6.
- Details
- Category: FAQ
- Hits: 7974
Every Joomla extension that has frontend output needs to have a menu item pointing to it.
This is mentioned in the CB Installation pdf included in the CB distibution package.
It's also mentioned in the readme files.
It's also mentioned many times in forum posts.
Please make sure you follow installation/configuration instructions.
- Details
- Category: FAQ
- Hits: 6831
Professional members get following benefits:
- Access to latest CB stable release and all Free pacakges from the Downloads area
- Access to CB PRIMER Book from the Downloads area
- Access to all CB GroupJive plugins from the Downloads area
- Access to CB Connect add-on from the Downloads area
- Access to the CB Activity add-on from the Downloads area
- Access to all Professional 30 add-ons from the Downloads area.
- Access to RC (release candidate) and nightly build packages of CB and other add-ons when available.
- Posting privileges on the Professional Support forum area for same/next business day response handling by CB Team members.
- Authorization to remove the Powered by Community Builder footer in front-end
- Discounts for other products and services
When your 3/6/12 month subscription is over you still keep and use what you downloaded forever on all your websites!
However you will no longer be able to download new add-on releases, nightly builds and packages and you will not be able to post support requests on the Professional support forums area.
You can become a Professional member and upgrade to Developer just by paying the price difference (no penalty or surcharge is applied as the pro-rated remaining value of your Professional membership is fully accounted for).
You can see a full comparison chart regarding available membership levels or upgrade now to a Professional or Developer plan.
- Details
- Category: FAQ
- Hits: 7214
Free members have the following benefits:
- Access to latest Community Builder stable release and other related packages from the Free Download area.
- Access to our frequently asked questions section.
- Access to our free tutorials, including the CB Primer Book designed to help you learn.
- Posting privileges on all our free, community driven forums where users can help each other.
- Receive Joomlapolis newsletters (2-4 times per month) with latest news and promotional offers (subscription is managed from your user profile Newsletters tab).
You can see a full comparison chart regarding available membership levels.
The free downloads you can access contain:
- Latest Community Builder package that includes:
- CB Component (installed using your Joomla Extensions menu)
- CB Login module (to use instead of the Joomla login module)
- CB Online module (to use instead of the Joomla user online module)
- CB Moderation Workflow module (for frontend moderation approvals)
- Installation guide
- Community Builder Application Programming Interface (API) if you wich to create your own CB plugins.
- CB Admin Navigation module to create Joomla (2.5, 1.5 or 1.0) administration area menu for CB (installed as a Joomla administration module).
- CB Core Redirect Joomla plugin (for Joomla 2.5) that will redirect any Joomla login or registration URLs to related CB pages.
- CB Author name user profile Joomla plugin (for Joomla 2.5) that will replace Joomla article author name with CB formated name of author that links back to author's CB user profile.
- PHP Memory testing script that will help you when Checking your PHP memory.
With the Free Community Builder downloads you can:
- Create extended registration forms that collecting additional details from your website applicants.
- Support registration approval workflows using frontend CB Workflow module where your moderation team can approve or reject new registrations.
- Create user profiles comprised of fields and organized in tabs.
- Create unlimited fields (single check-box, multi-select check-box, single select drop-down, multi-select drop-down, text, text area, html editor, image, password, email, web address, delimiter html).
- CB fields can be read only, marked for frontend profile display, included or not in registration form.
- User profile avatar images from preset gallery or from uploaded image (image approval is supported via CB Moderation Workflow module).
- Use included profile apps to integrate your profiles with Joomla articles (shown in author user profiles), to integrate with Kunena forum extension (Kunena forum must be downloaded and installed separtely) and to integrated wuth uddeIM private messaging (uddeIM extension must be downloaded and installed separetly).
- Create unlimited user lists that include CB field data and can be filtered by field data.
- Literally hundreds of built-in features that you can use and configure to customize your community.
You can get more add-ons, support and detailed Community Builder documentation by upgrading your membership.
- Details
- Category: FAQ
- Hits: 93433
The Joomla CMS is built using the PHP language. One of the main aspects of a PHP installation is that it is governed by many parameter settings typically situated in a php.ini file. There is also a PHP function called phpinfo() that can be used to display all the PHP settings (PHP Information) used in a specific installation.
Joomla 1.7 has a nifty method to check the PHP Information that is associated with the environment that is hosting the Joomla application. Just visit the Joomla 1.7 administration backend and access the “Site” menu and then the “System Information” sub-menu. On earlier Joomla versions (1.5), this information is reached by accessing the “Help” menu and then the “System Info” submenu.

The “System Information” submenu (or “System Info” on a Joomla 1.5 environment) will reveal all key aspects about your Joomla website with regards to the infrastructure supporting it. You will see information organized in the following tabs:
- System Information
- PHP settings
- Configuration File
- Directory Permissions
- PHP Information

As your Joomla knowledge improves you will be able to comprehend and understand many of these settings. You can of course research these settings on your own using your favorite search engine – there is plenty of information on the Internet and lots to learn.
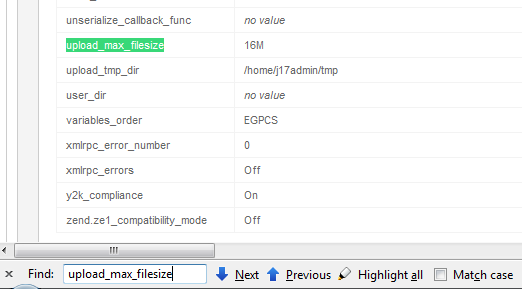
A key aspect that is important and might cause issues during the Community Builder component installation is that the actual component package (com_comprofiler.zip) is typically over the 2M and there are two PHP settings that could cause normal installation process to fail. These parameter are the ‘upload_max_filesize’ php parameter setting that (unfortunately) many hosting environments have imposed ‘2M’ as a default setting and the ‘post_max_size’ parameter. Both parameters must be set to something greater than 2M.
To check your specific setting just use the “Site Information” submenu to navigate to the “PHP Information” tab and then use your browser web-page search function (typically initiated with a Control-F short-cut) to search for the ‘upload_max_filesize’ parameter line in your PHP Information tab page. You will see the specific setting that Joomla sees.
And using a similar search to find the ‘post_max_size’ line in your ‘PHP Information’ page

Many of us tend to open a php.ini file located somewhere on our website and looking up the parameter setting. This is not an accurate way of determining the actual value that your Joomla environment is experiencing. Use the Joomla backend for this.
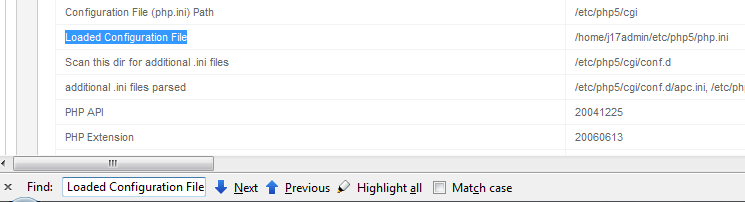
Another nice bit of data you can pick-up from the “PHP Information” tab is to search for ‘Loaded Configuration File ‘. The line that will appear in your browser will show you exactly which php.ini file your environment is loading.
On your localhost environment, you can basically edit this php.ini file using your text editor, search for the relevant parameter lines, update them and save changes. You will most likely need to restart your webserver (or even reboot).
On a remote hosting environment, if you do not have access to this file you will need to contact your host helpdesk and have them make any changes needed for you to increase the ‘upload_max_filesize’ php parameter. Actually, even if you do have access and can modify it, better be safe and open a ticket with your helpdesk as additional steps might be needed from their end (e.g., perhaps server restart is needed depending on hosting package).
If your host helpdesk refuses, you should seriously consider looking for a new host. This is a simple setting and there is really no real argument for not having this set to at least 8M.
Relevant Links
{mos_sb_discuss:254}